

Those who own the OnePlus 7 Pro should already know about its 90Hz display refresh rate feature. Sadly, the 90Hz setting will sometimes drop you down to 60Hz without prompting you. So, to prevent OxygenOS from dynamically changing it back down to 60Hz in certain apps and situations, you will want to follow this step by step tutorial.
This “mod” doesn’t require root access but it does require you to have a computer with ADB and Fastboot tools installed. It requires you to enable USB Debugging Mode and to execute a couple of commands in a Command Prompt, Windows PowerShell, or a regular terminal.
Someone may develop a root application in the future that does all of this for you.
For now, there isn’t much work to be done but those who have never installed Google’s ADB and Fastboot tools may feel out of place here. I have written up some previous tutorials that will walk you through all of the steps required to get to where you need to be though.
So be sure to follow those step carefully as you need to properly set up your environment (installing ADB/Fastboot, granting USB Debugging access, etc.) before you can start the step by step tutorial. Thankfully, once your environment is set up the actual tutorial part is very easy.
Time needed: 3 minutes.
How to Lock the OnePlus 7 Pro Display Refresh Rate at 90Hz in All Apps
- Connect the OnePlus 7 Pro to the PC with a USB cable
- Open up a Command Prompt, Windows PowerShell, or a Terminal
- Type out the following command. . .
- adb shell
- . . .and press Enter on the keyboard
- Make sure you’re given the new OnePlus7Pro shell prompt
- Then type out the following command. . .
- settings put global oneplus_screen_refresh_rate 0
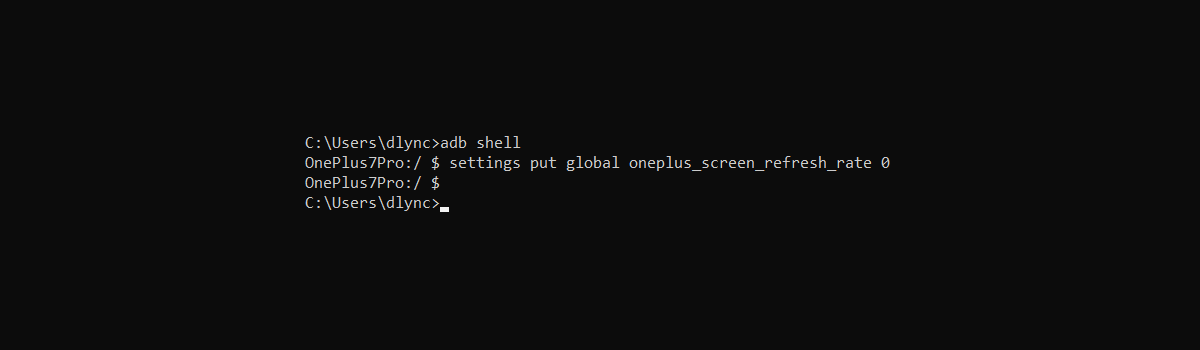
- . . .and press Enter on the keyboard again
- Now test the OnePlus 7 Pro like I do in the video below to make sure it worked
So, just like I said. The meat of this entire process is just getting everything ready. Once you a ready to go you just need to open up a Command Prompt (Windows PowerShell, or a terminal) and then go into adb shell mode. Once there, just type out (or paste) the longer command in there.
Execute it and you are good to go. As soon as you press Enter on the keyboard, you won’t see any changes on your smartphone. You could go into Settings -> Display -> Screen Refresh Rate and you probably won’t see any option selected. However, XDA Recognized Contributor, C3C076, says that a bug could show the 60Hz option as selected.
That is only a bug and you can follow along with me in the video to manually test the change.
So, in yesterday’s tutorial I showed you how to set the OnePlus 7 Pro display to 60Hz to save battery life. Some may question why you bought the OnePlus 7 Pro if you aren’t going to take advantage of the 90Hz display. There are many, many other things the smartphone has to offer than just the higher refresh rate.
I’m not going to get into that debate right now though. I just want to make sure you know that when you set the feature to 90Hz, it doesn’t keep the screen refresh rate at that number in all situations. You’ll definitely want to read that linked tutorial as I go into why OnePlus decided to do that with the OnePlus 7 Pro
OnePlus 7 Pro Locked at 90Hz Uses More Battery
OnePlus dynamically changes the display’s refresh rate from 90Hz to 60Hz (even when the 90Hz option is selected), because it makes little sense to refresh the screen 90 times per second in certain situations. I feel they sided on preserving battery life more than showing off the full capabilities of the OnePlus 7 Pro.
See, I don’t mind it when the smartphone goes from 90Hz to 60Hz when I open up the YouTube application (since no videos on the platform play faster than 60FPS). You miss out on the smoothness when scrolling, but the OnePlus 7 Pro automatically sets it to 60Hz when the app is open.
That means it stays at 60Hz the whole time the app is open and that doesn’t impact performance.
What I have an issue with is in applications such as Facebook, Instagram, Twitter, etc. When using those applications you can scroll through your feed at 90Hz. That’s great but as soon as a video appears on the screen then you can see visible hitching going on. Some call this lag, some call this jank, but it’s all the same to me.
It makes the experience of the app less than it could be. I feel that OnePlus should set apps to either use 90Hz or use 60Hz right when they are open (and they do that for a lot of apps). But there are specific instances when an app triggers something (such as displaying a video) that ruins the buttery smooth 90Hz mode.
With the OnePlus 7 Pro locked at 90Hz with this mod, you don’t experience that issue within any app.
Unlock the OnePlus 7 Pro from 90Hz
As I mentioned earlier, after you execute this adb shell command then there won’t be any options selected within the Settings application. Instead, there aren’t any options selected where you would normally choose between 90Hz and 60Hz. Sometimes a bug will show 60Hz is selected, but you can use the UFO test to check for yourself.
So, if you have experimented with locking the OnePlus 7 Pro at 90Hz and you’re done then you can easily change it back to the way it used to be. Simply go into Settings, then Display, then Screen Refresh Rate. From here, you can just choose either of these options (or even manually switch between them) to go back to the way things used to be.
Just know, 60Hz will give you more battery life, dynamic 90Hz uses a little bit more battery life, and a locked 90Hz will use even more.

1 comment