


Google has done some tremendous work in the post-processing department when it comes to its camera application. We’ve seen these ports do wonders for smartphones with cameras that just don’t rise to the occasion. The stock camera app of the Xiaomi Redmi 7 isn’t bad for the price, but images captured from this Google Camera port look much better.
You can find the GCam port for the Redmi Note 7 here.
A few years ago Google began to improve the camera framework used by Android devices. This resulted in the Camera2 API which has even had time to evolve throughout the years. The official GCam app that the company includes in the Pixel phones leverage this API and some hardware that is quite common.
The hardware that most Google Camera ports use is the DSP of Snapdragon chipsets and since the Redmi 7 uses a Snapdragon SoC the porting process is comparatively easy. It took some trial and error work from ilieff85 over on XDA to figure out which GCam port works best.
Not only that, but these ports have begun to include a lot of different settings to make them compatible with more devices.
Someone just has to go in and figure out the settings that work best on the Xiaomi Redmi 7. As of writing this, the linked APK for the Google Camera port along with the .XML file for its configuration is the most compatible with this smartphone. That doesn’t mean it’s perfect but it’s getting close to fully working.
Here we have the latest and best working GCam port for the Xiaomi Redmi 7 – Download APK Here – Download XML Here
Time needed: 5 minutes
How to Install the Best Google Camera Port on the Redmi 7
- Download the Google Camera port APK file
- Download the configuration .XML file
- Move or copy these two files to the Redmi 7
- Manually sideload the Google Camera port APK file and then open it
- Go into the Settings of the Google Camera port
- Scroll down to the bottom and tap on the Save Settings option
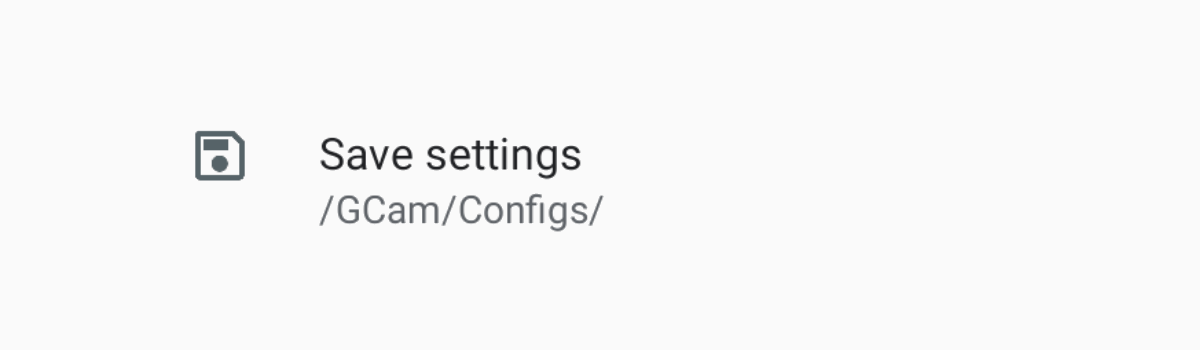
- Pick a name to save your default configuration setup
It doesn’t matter what you call it, we’re just doing this to create some folders
- Now open up your file manager of choice and move or copy the redmi7.xml configuration file to the /GCam/Configs/ folder
- Force close the Google Camera port application and then open it up again
- Double tap on the black area below the shutter button
This will bring up load configuration pop-up window.
- Make sure the redmi7.xml file is selected
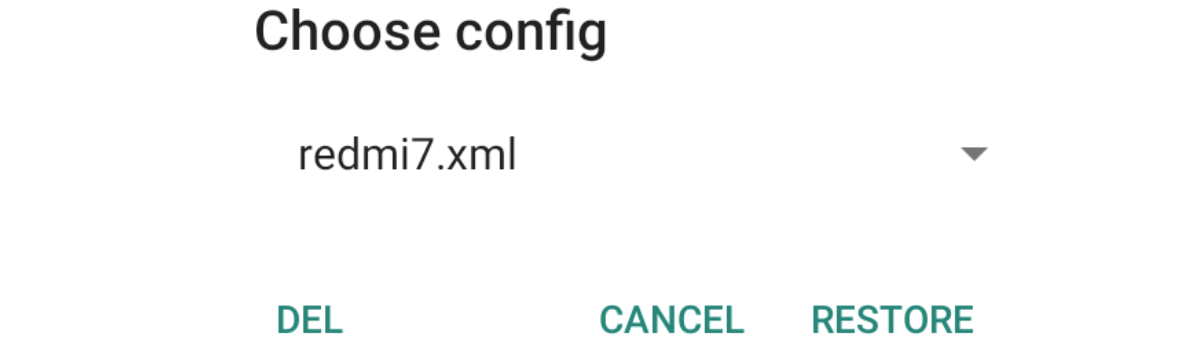
- And then tap on the Restore option
- Now most of the Google Camera port features should work on the Redmi 7
So as you most likely have expected, there isn’t much to this tutorial. The bulk of the actual work (for you) is just knowing how to sideload an APK file. I walk you through this process in the video but I have also linked to a tutorial in the step by step guide above that goes into further detail.
Beyond that, it’s just figuring out which port of the GCam application works the best on the Xiaomi Redmi 7. But, it goes even deeper because most of these ports also come with a bevy of configuration options to choose from. Some options are included in a port to add compatibility for a particular smartphone or hardware setup.
For example, most ports are made for Snapdragon chipsets but there are some for others (such as the Exynos chip from Samsung).
Redmi 7 GCam Configuration XML File, But Experiment
The Xiaomi Redmi 7 hasn’t been on the market for very long and that means that we are in the early stages of the smartphone’s lifecycle. This means that a lot of what is known (and done) now will be obsolete in the future. One of the ways we will see this is in the popular Google Camera port choice.
As of right now, it’s the version linked in the tutorial above along with the configuration options. However, this could change tomorrow, next week, next month, or multiple times throughout the year. There may even be some ports released that are specifically made for the Redmi 7 and its hardware set up.
So while I am recommending this solution for you today, experiment and see what is working for you. I say this because every single feature in the app is not working with what most people are using right now (aka what is recommended in this article). But this will change over time so it’s something to keep your eye on.
I recommend checking back here to see if things have changed as well as trying some things out for yourself.
If you do end up figuring out a better set up than what i currently presented then please feel free to let me (and most importantly, the community) know in the comments section below.
Processing HDR+ not complete.