Some of my more recent tutorials have centered around Android’s Seamless System Update feature. This feature requires the smartphone or tablet to have dual partition slots (slot A and slot B) so it can switch between the two during updates. However, we can use this system to our advantage and manually switch slots ourselves using a Fastboot command.
So, over the last week, I have shown you the ins and outs of just one new feature that we saw added in Android 8.0 Oreo. This feature is referred to by Google as Seamless System Updates and it is actually something the company brought over from its ChromeOS laptop/tablet operating system.
I will be breaking this feature down to explain it better in an Android 101 installment sometime in the future.
Previous tutorials have already shown you how to check if your device even supports the A/B partition slot system. Another tutorial instructs you on how to find out what your current active partition slot is. This tutorial will be taking things one final step and walking you through how to change the active partition slot.
This is rather useful as knowing how to change the active slot can actually get you out of a pickle. This can include anything from a bootloop to reverting back to an older update to avoid a bug (poor performance, massive battery loss). It can also be used to experiment with a custom ROM while keeping your current ROM (and all of its data).
There are many cool things we can do with Android and its A and B partition slots.
Time needed: 5 minutes.
How to Boot from One Active Partition Slot to Another
- Boot the smartphone or tablet into Fastboot Mode
- Connect the device to the PC with a USB cable
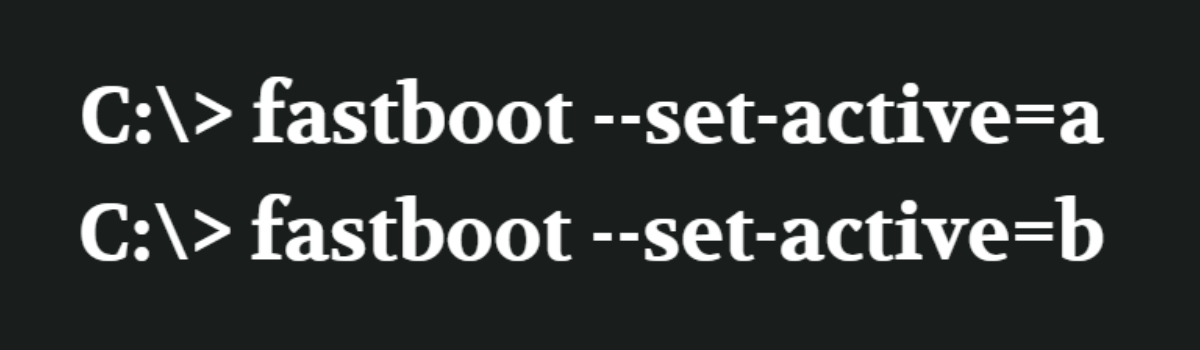
- Open a Command Prompt, PowerShell, or Terminal and type out the following command. . .
fastboot --set-active=a- . . .or. . .
fastboot --set-active=b- . . .and then press Enter on the keyboard
- Make sure you get a successful OKAY response
- Before restarting the device
You should know that in order to change to another slot you first need to know what your current slot is. That’s why I chose to create that tutorial before this one. So, once you have followed that tutorial and know if you are on partition slot A or partition slot B then you can proceed with this guide.
You can do this even if your device is currently in a bootloop. You just need to know how to boot the smartphone or tablet into Fastboot Mode (it’s different for various devices) in order to execute the required command. With that information in hand, you can then proceed to change the active boot slot.
We do this with the fastboot --set-active=a command with “a” indicating we are switching to the A partition slot.
Naturally, you will be swapping that =a part of the command for =b if you watch to switch to the B partition slot. So again, it all depends on what your current partition slot is. Once you know that, then you know which slot you want to set as the active partition slot for Android.
Boot From Slot A to Slot B or Boot From Slot B to Slot A
It doesn’t matter what your current slot is. You can switch to the other one as long as the device supports it. As I mentioned in the video above, I used this recently with the OnePlus 7 Pro when I installed an update that resulted in a bootloop. In less than 5 minutes I switched active slots and was back up and running.
I still have to fix the OTA update install issue that I had encountered but it was better than having to perform a factory reset.
You can do all sorts of stuff with this system but most custom ROMs will use it for installing new updates. Still, I like the idea of experimenting with these things. Having the ability to do stuff like duplicating the partitions and then using one to test out various software mods.
This way, even the worst-case scenario (the mod causing a bootloop) still isn’t bad at all because you can just change back to the other partition slot and then try again. You can even do this to test out multiple custom ROMs before deciding on which one to begin using long term.
The possibilities are almost limitless and I can only see the development community utilizing this more in the future.
Experiencing difficulties with your Device, check out our “How To” page on how to resolve some of these issues.