

Windows 10 on Raspberry Pi 3
Before diving into the installation process, it’s important to understand the challenges and limitations of running Windows 10 on a Raspberry Pi 3. While Windows IoT, a specialized version of Windows for smaller devices, can be installed on the Raspberry Pi 3 without major issues, running the full version of Windows 10 on this device is a different story. Wi-Fi connectivity may not be accessible, USB drives can be buggy, and SD card performance may suffer.
In comparison, Windows IoT offers its own set of advantages. With Windows IoT, you can create your own apps using Microsoft Visual Studio and enjoy internet connectivity, giving it a significant edge over the full version of Windows 10 on the Raspberry Pi 3. Consider your specific needs and requirements before deciding which operating system to install.
What You’ll Need
To successfully install Windows 10 on your Kano Computer, you’ll need the following tools and components:
- Raspberry Pi 3 Model B ($35)
- Tiano Core UEFI for Raspberry Pi (Free)
- MiniTool Partition Wizard Free (Free)
- UUP Generation Project (Free)
- WinZip (Free Trial)
- Win10 on Pi Download File (Free)
- Window 10 Lite (Free)
- SD card (with sufficient storage capacity)
Step-by-Step Installation Guide
Now that you have all the necessary tools, let’s dive into the step-by-step installation process for Windows 10 on your Kano Computer.
Step 1: Download the Win10 on Pi File
The first step is to download the Win10 on Pi file and place it in a dedicated folder on your computer. This file contains the necessary components for installing Windows 10 on your Raspberry Pi 3.
Step 2: Install WinZip
Next, visit the WinZip website and download the application. WinZip will be used to extract and manage the files required for the installation process.
Step 3: Download the UEFI Zip File
Download the UEFI zip file from Andreiw, which contains the necessary files for booting Windows 10 on your Raspberry Pi 3.
Step 4: Extract the UEFI Files
Extract the Debug folder from the UEFI zip file and place it in the folder where you downloaded the Win10 on Pi file. This folder will be used later in the installation process.
Step 5: Obtain the Windows 10 ISO Image
Visit the UUP website and input the required information to generate a link for downloading the Windows 10 ISO image. Once generated, download the ISO image and open it with WinZip.
Step 6: Create a New Folder
Create a new folder and extract all the files from the ISO image using WinZip. These files will be used in the later stages of the installation process.
Step 7: Run the CreatingISO Batch File
Locate and run the CreatingISO batch file, which will compile the necessary files for creating the Windows 10 installation image. This process may take up to 20 minutes or more, depending on your system’s performance.
Step 8: Copy the install.wim File
Navigate to the Source folder within the extracted ISO files and locate the install.wim file. Copy this file to the folder where you stored the Win10 on Pi files and UEFI Debug folder.
Step 9: Extract the systems32 Folder
Open the Win10 on Pi folder and extract only the systems32 folder. This folder contains the essential components for running Windows 10 on your Kano Computer.
Step 10: Eject the DVD Drive
Once you have extracted the systems32 folder, eject the DVD drive from your computer. You are now ready to proceed with the installation process on your Raspberry Pi 3.
Step 11: Using the Command Prompt
Now, let’s move on to the installation process on the Raspberry Pi 3 itself. Start by opening a command prompt on your computer. Ensure that you run it as an administrator to avoid any issues.
Step 12: Copy the Directory
Copy the directory path where you have compiled all the Windows 10 on Pi files. This path will be used in the subsequent commands.
Step 13: Create a New Folder
In the command prompt, create a new folder with the label “m” using the command “mkdir m”. This folder is essential for mounting the Windows 10 image.
Step 14: Mount the Windows 10 Image
Copy and paste the command “dism /mount-image /imagefile:install.wim /Index:1 /MountDir:m” into the command prompt. This command will mount the Windows 10 image in the “m” folder.
Step 15: Add Drivers
Copy and paste the command “dism /image:m /add-driver /driver:foldername /recurse /forceunsigned” into the command prompt. Replace “foldername” with the name of the folder containing the UEFI Debug files. This command will add the necessary drivers to the Windows 10 image.
Step 16: Unmount the Windows 10 Image
Copy and paste the command “dism /unmount-wim /mountdir:m /commit” into the command prompt. This command will unmount the Windows 10 image and commit the changes.
Step 17: Create Partitions in MiniTool
Open MiniTool Partition Wizard and delete any existing partitions on your SD card. If there are no existing partitions, you can skip this step. Create a new partition for the Windows 10 installation.
Step 18: Copy Debug Files to the BOOT Partition
Copy the files from the UEFI Debug folder to the BOOT partition on your SD card. These files are necessary for booting Windows 10 on your Raspberry Pi 3.
Step 19: Insert the Code into Command Prompt and SourceForge
Return to the command prompt and insert the command “dism /apply-image /imagefile:install.wim /index:1 /applydir:F:” to apply the Windows 10 image to your SD card. Replace “F” with the drive letter assigned to your SD card.
Step 20: Configure Boot Settings
Insert the command “bcdboot F:\Windows /s E: /f UEFI” in the command prompt to configure the boot settings for Windows 10. Replace “F” with the drive letter assigned to your SD card and “E” with the drive letter assigned to the BOOT partition.
Step 21: Enable Test Signing
Insert the command “bcdedit /store E:\EFI\Microsoft\Boot\bcd /set { default } testsigning on” in the command prompt to enable test signing for Windows 10. This step is necessary for running unsigned drivers.
Step 22: Disable Integrity Checks
Insert the command “bcdedit /store E:\EFI\Microsoft\Boot\bcd /set { default } nointegritychecks on” in the command prompt to disable integrity checks for Windows 10. This step is necessary for bypassing integrity checks during the boot process.
Step 23: Prepare the Notepad Document
Go to SourceForge and copy the text between the “cut here” points. Paste this text into a Notepad document and save it on your desktop.
Step 24: Move the Notepad Document to the SD Card
Move the Notepad document containing the copied code to your SD card. This file will be used to further configure Windows 10 on your Raspberry Pi 3.
Step 25: Loading up Windows 10
Insert the SD card into your Raspberry Pi 3 and power it on. If you have followed all the steps correctly, you should see the Windows 10 installation screen on your Kano Computer.
Step 26: Accessing Command Prompt
An error code may appear on the screen. Press “Shift+F10” to trigger the Command Prompt to appear. This will allow you to access system settings and make necessary changes.
Step 27: Open Computer Management
Within the Command Prompt window, type “mmc” after the first “/system32/” and press Enter. This will open Computer Management, where you can make further adjustments.
Step 28: Enable Administrator Account
Under the Computer Management tab, click on “Local Users and Groups” and then click on “Users”. Locate the “Administrator” account, uncheck the “account is disabled” option, and click OK. You can also set a password for the Administrator account if desired.
Step 29: Paste the Code
Return to the Command Prompt and paste the code from the Notepad document. This code will further configure Windows 10 on your Raspberry Pi 3.
Step 30: Run the File
Run the file by inserting the appropriate command in the Command Prompt. This will execute the code and apply the necessary changes to the system.
Step 31: Reboot Your Kano Computer
To complete the installation process, insert the command “shutdown /r” in the Command Prompt to reboot your Kano Computer. If the command doesn’t work, you can manually remove the power plug to restart the system.
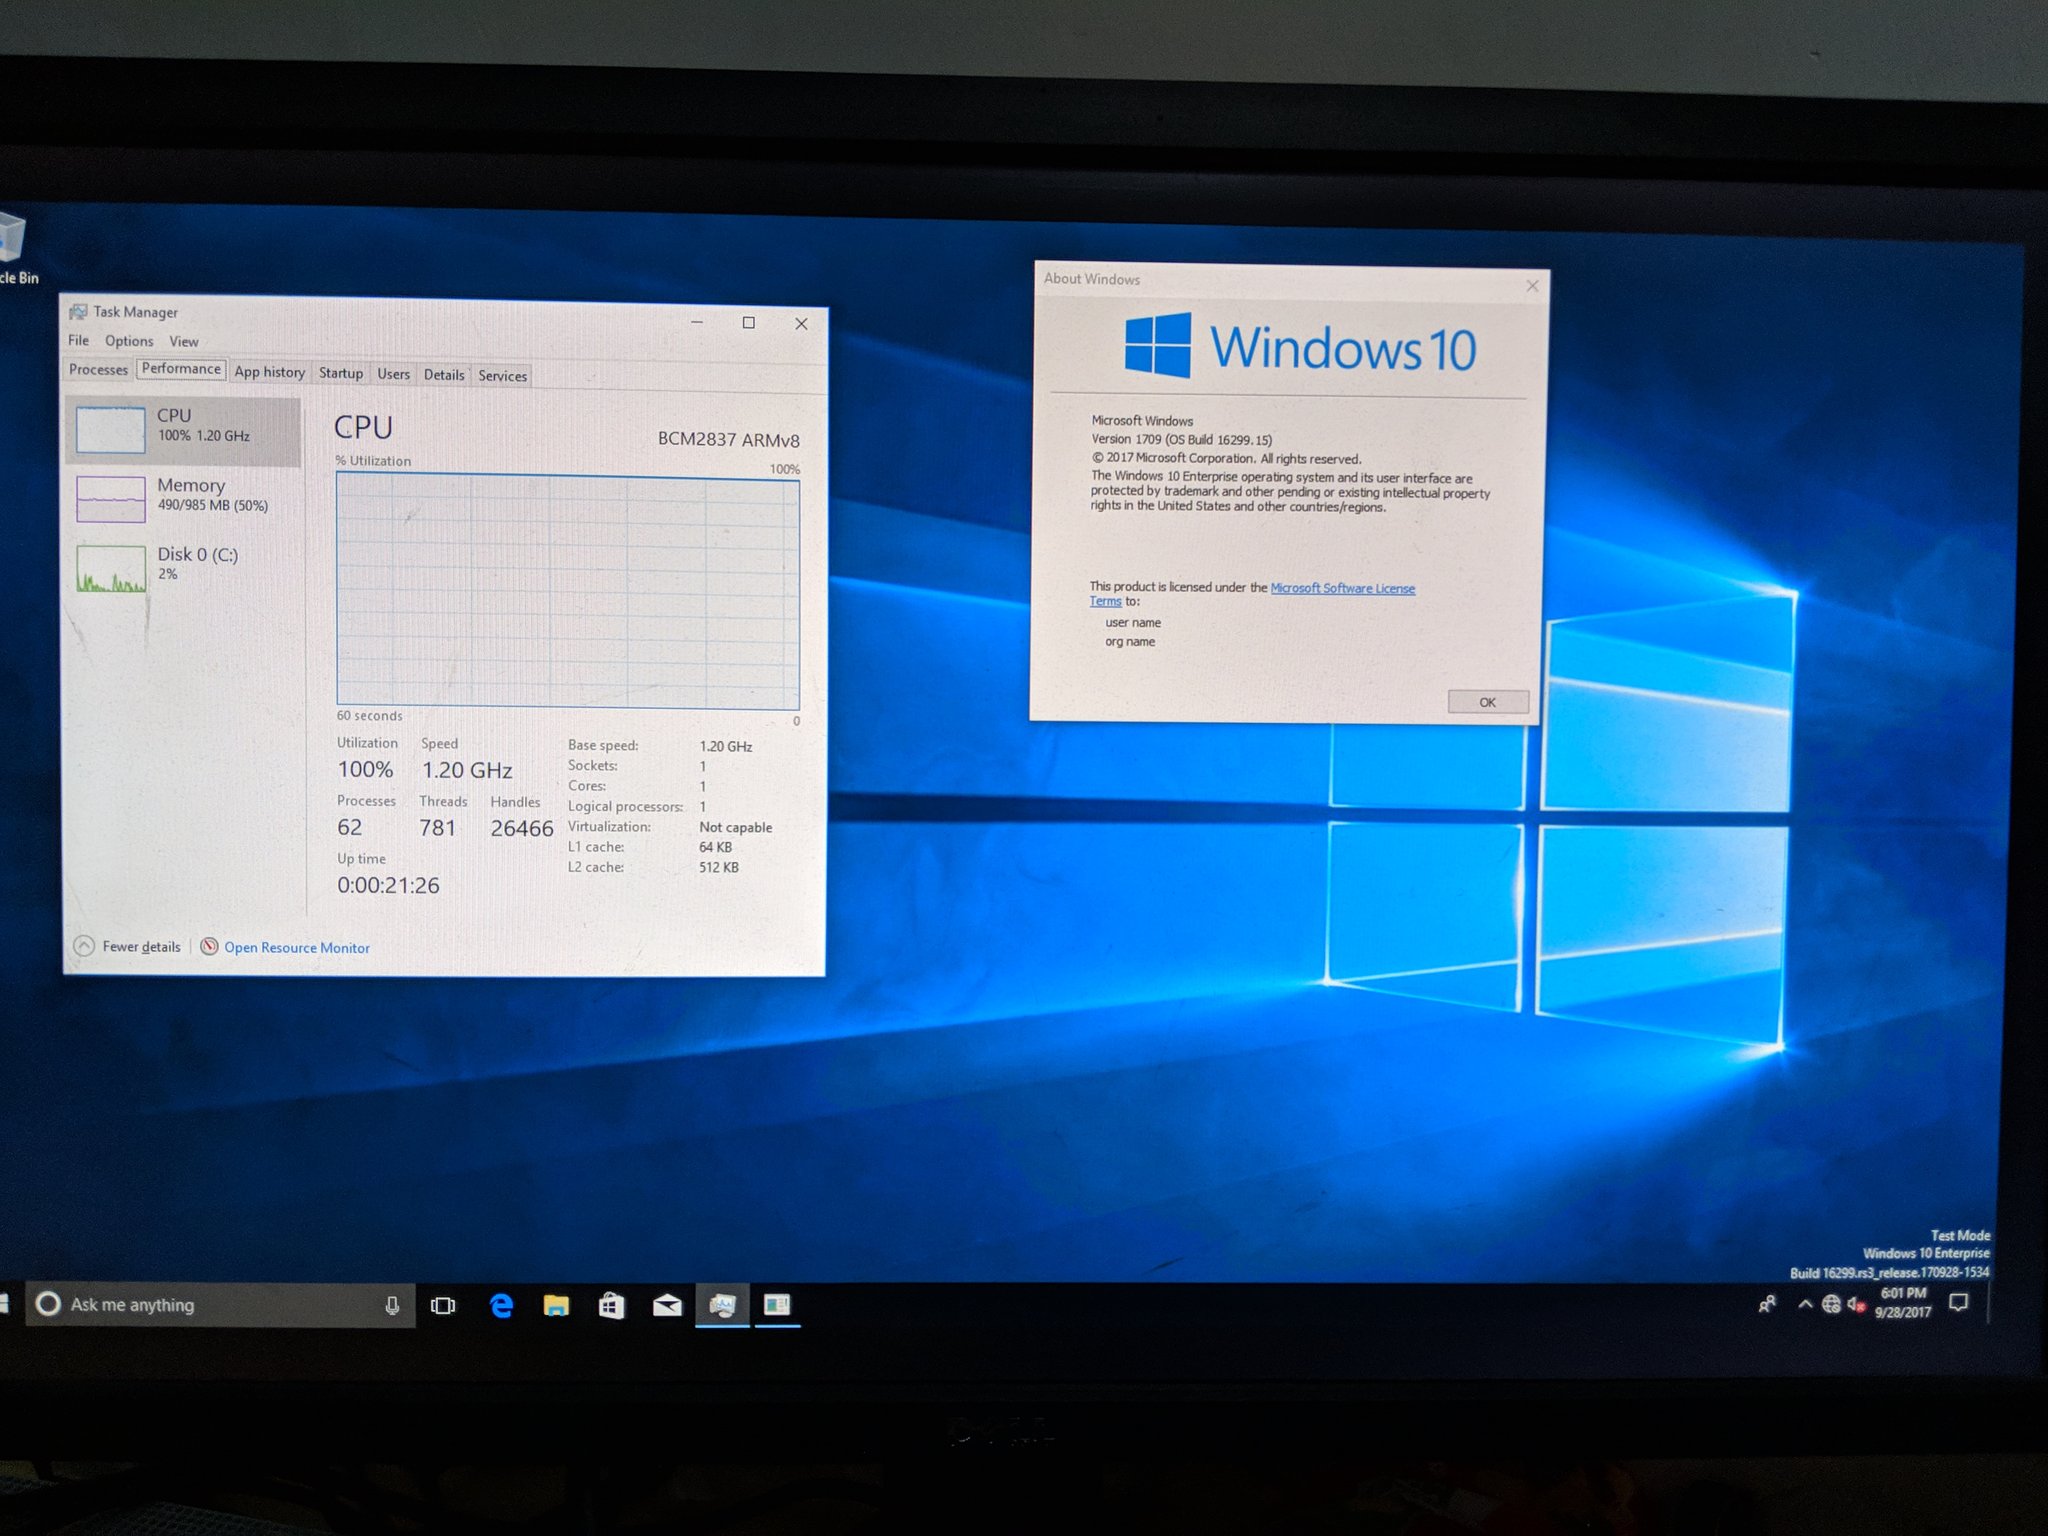
Congratulations! After a significant waiting period, Windows 10 should now be up and running on your Kano Computer. You can now enjoy the benefits of running a full-fledged operating system on your Raspberry Pi 3.
Conclusion
Installing Windows 10 on your Kano Computer is a challenging process, but with the right tools and guidance, it can be accomplished. By following the step-by-step instructions in this guide, you can unleash the full potential of your Raspberry Pi 3 and explore a whole new world of possibilities. Whether you choose Windows 10 or Windows IoT, both operating systems offer unique advantages and can cater to different needs. Remember to consider your requirements and limitations before proceeding with the installation. Happy computing!


1 comment