


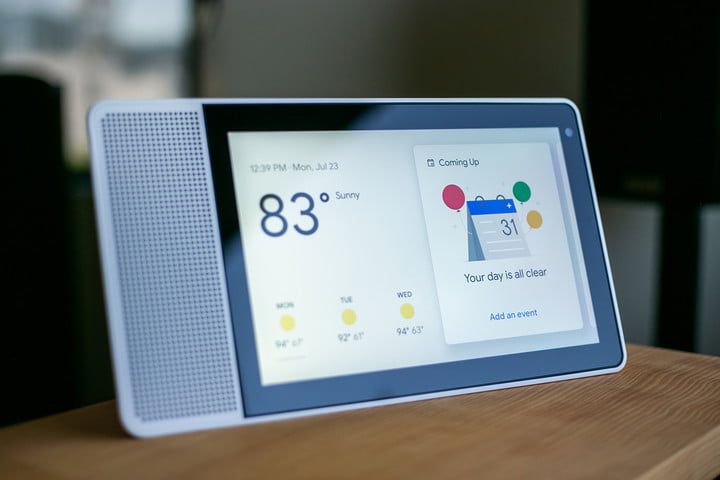
In this digital age, most of us upgrade our smartphones frequently, leaving us with old Android phones that are often forgotten and left to gather dust. However, did you know that you can repurpose your old Android phone and turn it into a Google Assistant smart display? With just a few simple steps, you can give new life to your old device and enjoy the convenience and functionality of a smart display. In this comprehensive guide, we will walk you through the process of transforming your old Android phone into a Google Assistant smart display.
Why Repurpose Your Old Android Phone?
Before we dive into the step-by-step process, let’s first explore why you should consider repurposing your old Android phone into a Google Assistant smart display. Here are a few compelling reasons:
- Cost-effective: Repurposing your old phone eliminates the need to purchase a dedicated smart display, saving you money.
- Reduce electronic waste: By repurposing your old phone, you contribute to reducing electronic waste and promote sustainability.
- Extra functionality: Transforming your old Android phone into a smart display allows you to access a wide range of features and services offered by Google Assistant.
- Convenience: With a smart display, you can easily control your smart home devices, manage your calendar, check the weather, and much more, all with just your voice.
Now that you understand the benefits, let’s dive into the step-by-step process of turning your old Android phone into a Google Assistant smart display.
Step 1: Enabling Developer Options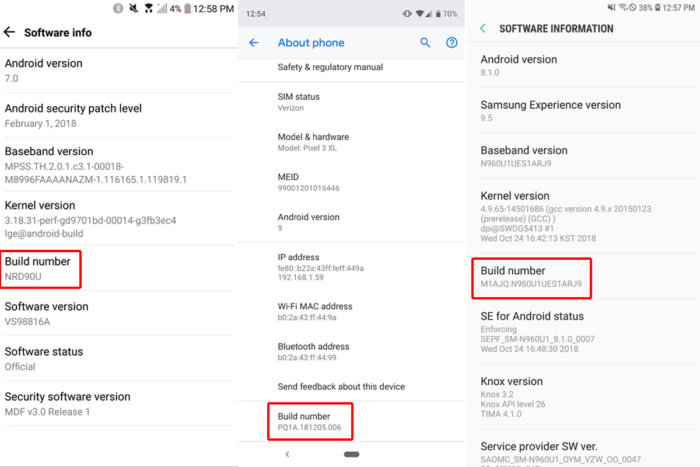
To begin the transformation, you need to enable the Developer Options on your old Android phone. Please note that the steps may vary slightly depending on the tablet and the version of Android it is running.
- Go to Settings on your Android phone.
- Scroll down and tap on About Phone or About Device.
- Locate the Build Number and tap on it repeatedly until you see a message indicating that you are now a developer.
Congratulations! You have successfully enabled the Developer Options on your old Android phone.
Step 2: Enabling Stay Awake
The next step is to enable the Stay Awake option in the Developer Options. This will ensure that your phone stays on when it is charging, allowing it to function as a smart display even when not in use.
- Go back to the main Settings menu.
- Scroll down and tap on Developer Options.
- Look for the Stay Awake option and toggle it on.
Great! Your old Android phone will now stay awake when it is charging, making it suitable for use as a smart display.
Step 3: Setting a Wallpaper
Now that you have enabled the necessary settings, it’s time to personalize your smart display by setting a wallpaper of your choice. Follow these steps to set a wallpaper on your old Android phone:
- Go to your phone’s App Drawer.
- Look for the Widgets section and swipe through the options.
- Locate the widget that allows you to set a wallpaper and hold and drag it onto the home screen.
Now, you can select a wallpaper from your phone’s gallery and set it as the background for your smart display. Choose a visually appealing wallpaper that suits your style and preferences.
Step 4: Adding Widgets to Your Smart Display
One of the key features of a smart display is the ability to add widgets for quick access to information and functions. Here’s how you can add widgets to your old Android phone turned smart display:
- Long-press on an empty area of your home screen.
- Tap on the Widgets option that appears at the bottom of the screen.
- Browse through the available widgets and select the ones you want to add.
- Hold and drag the selected widgets onto your home screen.
You can choose from a variety of widgets, such as a calendar, to-do list, clock, weather, and much more. Experiment with different widgets to find the ones that suit your needs and enhance the functionality of your smart display.
Step 5: Resizing Widgets
To optimize the layout of your smart display, you can resize the widgets according to your preferences. Follow these steps to resize the widgets on your old Android phone:
- Long-press on the widget you want to resize.
- When white dots appear on the edges of the widget, it means you can now resize it.
- Hold and drag the white dots to resize the widget as desired.
Not all widgets will fit perfectly on your screen, so resizing them allows you to create an organized and visually pleasing layout. Experiment with different sizes and combinations to find the most suitable arrangement for your smart display.
Step 6: Customizing Your Smart Display
Now that you have added widgets and resized them, it’s time to customize your smart display further. Here are a few additional customization options to consider:
- Adding and Removing Widgets: You can always add new widgets or replace existing ones. Simply hold and drag a widget to the edge of the screen and add a new one of your choice.
- Wallpaper: If you want to change the wallpaper later, simply go to Settings > Display > Wallpaper and select a new image from your gallery.
- Screen Timeout: To adjust the screen timeout settings, go to Settings > Display > Sleep and choose the desired duration.
Feel free to experiment with different customization options to create a unique and personalized smart display experience that suits your preferences.
Step 7: Utilizing Google Assistant Features
Now that your old Android phone has been transformed into a Google Assistant smart display, you can take full advantage of the features and functionalities offered by Google Assistant. Here are some popular ways to utilize Google Assistant on your smart display:
- Voice Commands: Use your voice to ask Google Assistant questions, set reminders, play music, control smart home devices, and much more.
- Smart Home Control: Connect your smart home devices, such as lights, thermostats, and cameras, to your Google Assistant smart display for easy control and automation.
- Personalized Information: Customize your smart display to show relevant information such as weather updates, upcoming calendar events, and news headlines.
- Media Playback: Enjoy music, podcasts, and videos on your smart display by using voice commands or selecting media from your favorite streaming services.
- Productivity Tools: Take advantage of productivity tools such as timers, alarms, and to-do lists to stay organized and efficient.
With Google Assistant at your fingertips, your old Android phone turned smart display becomes a powerful tool for managing your daily tasks, accessing information, and controlling your smart home devices.
Step 8: Troubleshooting Common Issues
As with any technology, you may encounter some challenges along the way. Here are a few common issues that you may come across and how to troubleshoot them:
- Display Not Turning On: Ensure that your old Android phone is connected to a power source and charging properly. If the issue persists, try restarting the device.
- Unresponsive Touchscreen: Clean the screen to remove any dirt or smudges that may be interfering with the touch response. If the problem continues, try recalibrating the touchscreen in the device settings.
- Widget Compatibility: Some widgets may not be compatible with your specific Android version or screen resolution. Try alternative widgets or search for updated versions that are compatible with your device.
- Wi-Fi Connectivity: If your smart display is not connecting to Wi-Fi, check the Wi-Fi settings on your device and ensure that you have entered the correct password. You can also try restarting your router or resetting network settings on your phone.
If you encounter any other issues, consult the manufacturer’s support website or online forums for specific troubleshooting steps related to your device model.
Step 9: Security and Privacy Considerations
While transforming your old Android phone into a smart display can be exciting, it’s essential to prioritize security and privacy. Here are a few tips to ensure the security of your smart display:
- Keep Software Updated: Regularly update the operating system and apps on your old Android phone to ensure you have the latest security patches and bug fixes.
- Use a Strong Password: Set a strong password or PIN to protect your smart display from unauthorized access. Avoid using easily guessable passwords and consider enabling biometric authentication if available.
- Review App Permissions: Check the permissions granted to each app on your smart display and revoke any unnecessary permissions that may compromise your privacy.
- Secure Network Connection: Ensure that your smart display is connected to a secure Wi-Fi network with a strong password. Avoid using public networks that may be susceptible to hacking.
By following these security measures, you can enjoy the benefits of a smart display while keeping your personal information and data secure.
Step 10: Exploring Additional Smart Display Features
Your old Android phone, now transformed into a Google Assistant smart display, offers a wide range of features and capabilities. Here are a few additional features to explore:
- Routines: Set up routines to automate tasks and create personalized shortcuts for your smart display. For example, you can create a routine that turns on the lights and plays your favorite music when you say, “Good morning.”
- Broadcast Messages: Use your smart display to send broadcast messages to other Google Assistant devices in your home. This is a convenient way to communicate with family members or announce important information throughout the house.
- Multi-Room Audio: If you have multiple Google Assistant devices, you can create a speaker group and enjoy synchronized music playback throughout your home.
Take the time to explore these additional features and make the most of your new Google Assistant smart display.
Step 11: Repurposing Tips for Different Android Devices
The steps outlined above are generally applicable to most Android devices. However, depending on the specific device and version of Android, there may be slight variations. Here are a few tips to consider when repurposing different types of Android devices:
- Tablets: If you are repurposing an Android tablet, the steps outlined in this guide should work seamlessly. However, keep in mind that the screen size and aspect ratio may differ from smartphones, affecting the layout and sizing of widgets.
- Older Android Versions: If your old Android phone is running an older version of Android, some features or settings may be located in different menus or have different names. Refer to the device’s user manual or search online for specific instructions related to your device model and Android version.
By adapting the steps to your specific Android device, you can successfully repurpose it into a Google Assistant smart display.
Step 12: Embrace the Possibilities of Your Smart Display
Congratulations! You have successfully transformed your old Android phone into a Google Assistant smart display. Now, it’s time to embrace the possibilities and enjoy the convenience and functionality it offers. Here are a few ideas to get you started:
- Smart Home Control: Use your smart display to control your smart home devices, such as lights, thermostats, and security cameras, with just your voice.
- Personal Assistant: Ask Google Assistant on your smart display to set reminders, make phone calls, send messages, and answer questions.
- Media Playback: Enjoy your favorite music, podcasts, and videos on your smart display by using voice commands or selecting media from popular streaming services.
- Daily Information: Customize your smart display to show the weather forecast, your daily schedule, news headlines, and other relevant information.
- Cooking Assistant: Follow recipes on your smart display, set timers, and convert measurements effortlessly while preparing meals.
The possibilities are endless with your new Google Assistant smart display. Explore and experiment with different features to make the most of this innovative technology.
Conclusion
Repurposing your old Android phone into a Google Assistant smart display is a practical and cost-effective way to breathe new life into your device. By following the step-by-step process outlined in this guide, you can transform your old phone into a versatile smart display that offers convenience, functionality, and a range of exciting features. Embrace the possibilities and enjoy the benefits of a smart display in your daily life.


This just a bunch of widgets and not an actual google assistant smart display