The experience of pressing the power button on your PC and receiving only silence or an unresponsive screen can be immensely frustrating. When your system fails to respond after powering on, showing no splash screen and providing no error messages, it signals a Power-On Self-Test(POST) failure. This means that your computer is unable to load anything, including the BIOS. This comprehensive guide is designed to help you navigate the troubleshooting process when your PC refuses to boot to BIOS. From expert solutions to specialized techniques, we’ll delve into the various hardware-related issues that might be causing this problem.
Identifying Signs of POST Failure
One of the most effective ways to diagnose the cause of your PC’s failure to boot is by examining the POST LED indicators or listening for beep codes. Unfortunately, not all motherboards offer these features. In their absence, you’ll need to take a closer look at each individual component.
When faced with this challenge, many experts turn to a series of fixes. These fixes may involve actions such as clearing the CMOS, investigating potential power supply failures, reseating RAM and GPU modules and scrutinizing the CPU and cooling system. If none of these steps yield results, you might need to identify the root issue by booting up the system with only the essential components.
Addressing Hardware Issues Affecting BIOS Booting
In this article, we will concentrate solely on the hardware-related problems that can prevent the BIOS from booting. If you are able to log into Windows but find that the BIOS Utility fails to appear, we’ve linked a separate guide that will help you troubleshoot and fix this particular issue.
The Basics
One of the most common mistakes users make is connecting the monitor to the motherboard’s I/O port even when a dedicated graphics card is installed. This can lead to problems if your processor lacks integrated graphics or if this feature is disabled in the BIOS. As a result, the monitor may not display anything, giving the impression that your PC is failing to boot. To address this, it’s important to ensure that you’re using the correct video port for your display device.
If you intend to use onboard graphics, verify whether your Intel or AMD CPU supports it. Additionally, make sure that the integrated graphics(iGPU) option is enabled in the BIOS settings. If necessary, temporarily detach the discrete GPU and adjust the BIOS settings accordingly.
Deciphering POST LED and Beep Codes
The process of troubleshooting a PC that refuses to boot can be complex, given that any component—whether it’s the CPU, GPU, RAM, Boot Drive, or PSU—could potentially be causing the problem. However, the process becomes much smoother if your motherboard is equipped with a POST LED indicator or a beep speaker. These tools can provide valuable information through on-screen codes or distinctive patterns of beeping, which can offer insights into the underlying issue.
Different motherboard brands may present varying LED codes and beep patterns, which is why guides tailored to specific brands can be so valuable. To assist you further, our team has curated guides for popular motherboards, which can aid you in deciphering the issue based on the provided codes. In some cases, motherboards may also have debug LEDs for components like the CPU, DRAM, VGA and BOOT, which can illuminate and indicate where the problem lies.
Troubleshooting the Power Supply
Insufficient power supply from the PSU is a common reason for PCs failing to boot. Signs of this issue include the RGB lighting on the motherboard failing to illuminate and pressing the power button having no effect. To address this concern, start by ensuring that the ATX and CPU cables are securely connected. It’s also crucial to inspect these cables for any signs of damage.
If the PSU remains unresponsive, check the power switch and consider trying a different power cord or wall outlet, as faulty connections could be causing the problem. If you suspect PSU failure, using a spare power supply can help you determine whether an upgrade is necessary. For those with advanced hardware knowledge and access to the appropriate equipment, testing the PSU is also a possibility.
Reseating RAM and Inspecting Slots
When confronted with a red light emanating from the motherboard’s DRAM LED, RAM-related issues are likely the cause. In this scenario, reseating or reinstalling your RAM sticks is a recommended step. Ensure that the notch on the RAM stick aligns with the slot bump, taking care not to exert excessive force.
If reseating the RAM proves ineffective, consider testing each RAM stick individually to identify the faulty one. It’s also advisable to test different RAM slots to ensure they’re all functioning properly. In certain cases, prolonged RAM overclocking can lead to system instability. Clearing the CMOS often rectifies this situation.
Assessing the CPU and Cooling System
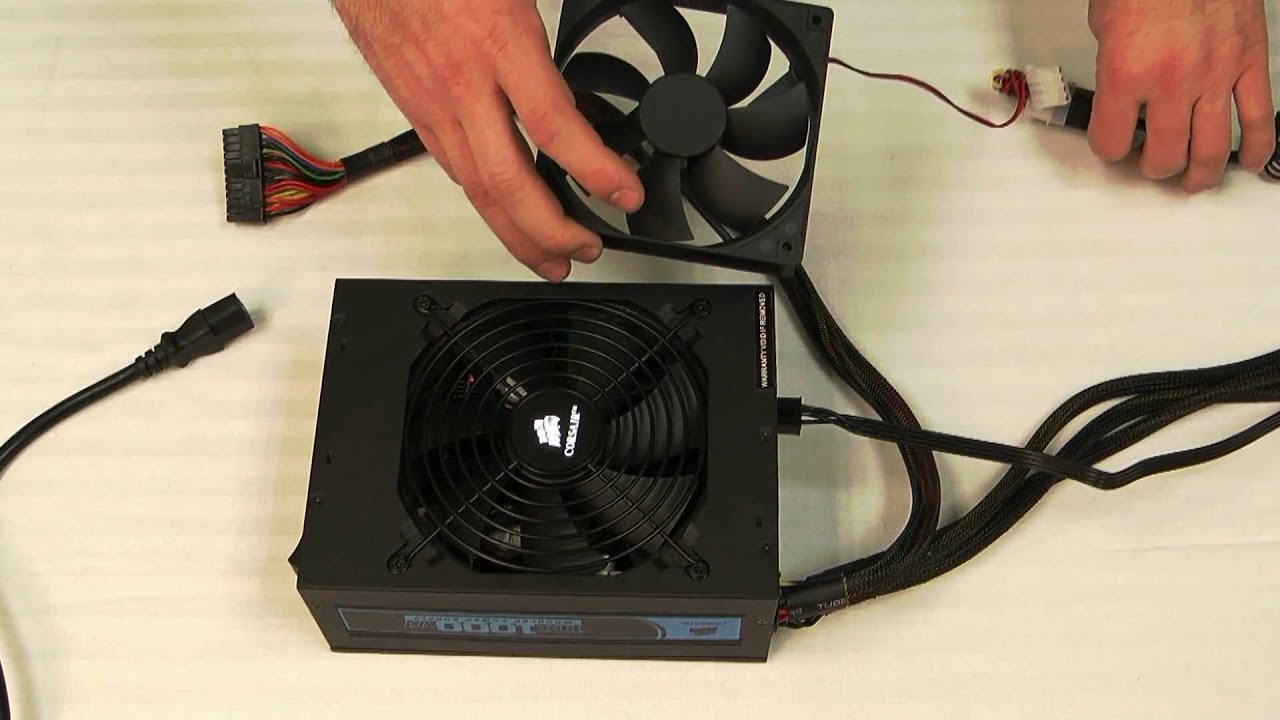
Issues with the CPU can prevent the system from initializing. To begin troubleshooting, confirm that the CPU fan is operational and properly connected to the correct fan header, which is often labeled as CPU_FAN. While overheating typically doesn’t prevent the system from Posting, it can lead to instability after booting. If the CPU fan appears damaged, consider upgrading to a more robust cooling solution. Reapplying thermal paste and inspecting for bent pins are also recommended steps to address potential CPU-related problems.
Reseating Graphics Cards and PCIe Slots
Resolving display-related issues tied to the graphics card is paramount. Reinstalling the graphics card and ensuring a secure fit, as well as checking the PCIe power cable connection, are initial steps to consider. If these actions fail to resolve the issue, switching to a different PCIe slot can offer insights into the problem’s source. It’s also important to update graphics card firmware, especially if you’re encountering issues with a DisplayPort cable. Damaged PCIe slots or GPUs may necessitate replacement or confirmation using alternate components.
Diagnosing Boot Drive Issues
A red BOOT diode signals problems with the connected HDD/SSD, which can stem from a loose connection, an absent operating system, a corrupted drive, or other issues. Begin by disconnecting all non-essential peripherals and storage devices, booting only with the essential boot drive. If the issue is resolved, you can identify the source of the problem.
If not, disconnect the boot drive itself and check if the PC can access the BIOS. Reconnecting the SATA or NVMe SSD cables and verifying proper installation are essential steps. Using a spare bootable storage drive can help verify the functionality of headers, slots and cables. If the drive initializes slowly, a green light will indicate this process.
Booting With Core Components
When all else fails, returning to the basics can help identify the issue. Booting up with core components—processor, CPU cooler, a single RAM stick, PSU cables(ATX and CPU) and a graphics card(if integrated graphics are not supported)—can help diagnose the problem. This method is especially useful when a new PC build or component upgrade leads to a lack of display. Compatibility is crucial in such scenarios; ensure that parts are compatible with both the motherboard and CPU. Proper installation of standoffs and spacers can prevent short-circuits between the motherboard and chassis.
Flashing, Reflashing and Recovering BIOS
Updating or flashing the BIOS can resolve stability issues caused by outdated firmware. Begin by downloading the BIOS driver from your motherboard’s support page and transferring it to a USB drive. If your motherboard supports the feature, use the USB Flashback button to initiate the process.
Alternatively, follow the manufacturer’s recommended procedure if this feature is unavailable. In the event of a failed or interrupted BIOS update, some motherboards offer dual BIOS or built-in recovery tools. For advanced users, options like replacing the BIOS chip or reprogramming it using tools like the SPI CH341A Mini Programmer are also available.
Conclusion
In the event that none of these comprehensive troubleshooting steps lead to a resolution, it’s advisable to seek assistance from authorized vendors or the manufacturer. If components are faulty or incompatible, check whether your warranty covers these issues. Remember, a non-booting PC can be a puzzle, but with patience, expertise and these solutions at your disposal, you’ll be better equipped to conquer even the most stubborn booting challenges.
Experiencing difficulties with your Device, check out our “How To” page on how to resolve some of these issues.