

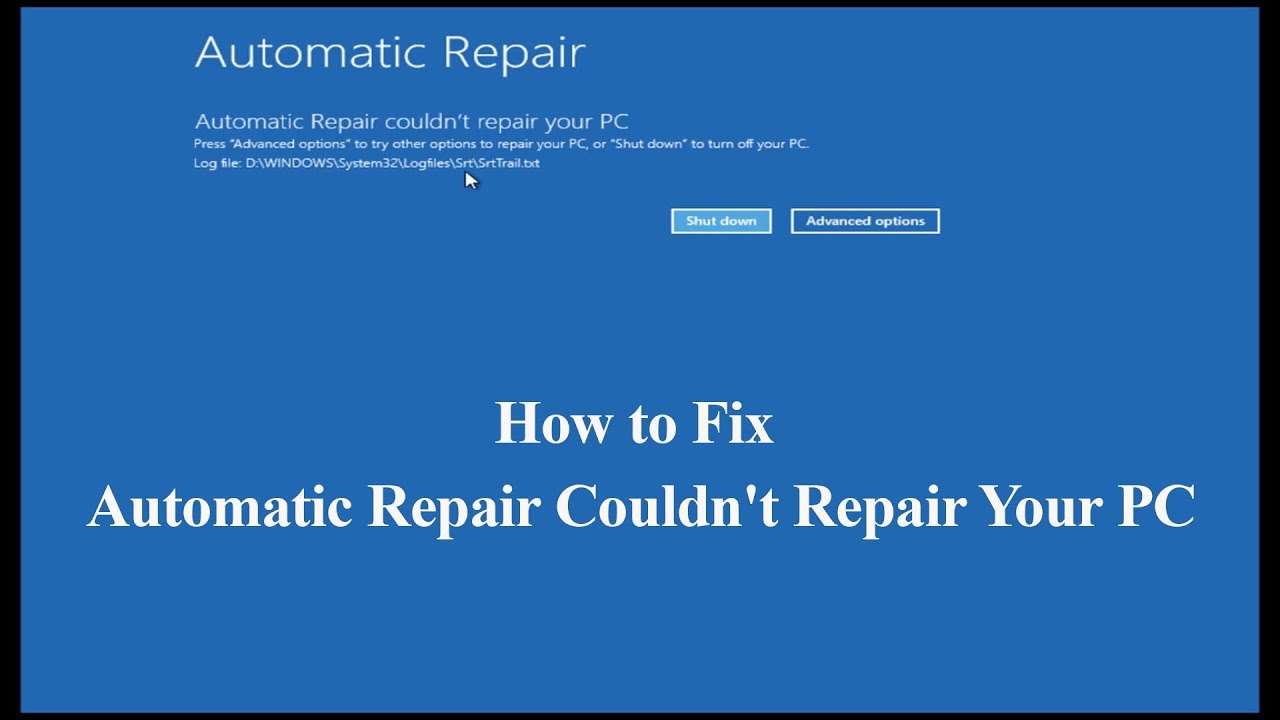
If you’re a Windows user, you may have encountered the frustrating “Automatic Startup Repair couldn’t repair your PC” error message. This error can prevent your computer from starting up properly and accessing important files and applications. But don’t worry, we’re here to help. In this comprehensive guide, we’ll provide step-by-step instructions on how to fix this error and get your PC back up and running smoothly.
Understanding the “Automatic Startup Repair Couldn’t Repair Your PC” Error
Before we dive into the solutions, let’s first understand what causes the “Automatic Startup Repair couldn’t repair your PC” error. This error message can occur due to various reasons, including:
- Corrupted operating system: If your operating system files are corrupted or damaged, the Startup Repair tool may fail to fix the error. This could be caused by malware, viruses, or other malicious software that compromises your system files.
- Hardware issues: Problems with your hardware components, such as a failing hard drive or faulty RAM, can interfere with the startup process and prevent the Automatic Startup Repair tool from functioning correctly.
- System settings: Outdated drivers, incorrect BIOS settings, or incompatible programs can also cause the Automatic Startup Repair to fail.
- Insufficient space or resources: Your computer may not have enough available space or memory (RAM) to install new updates or fixes from Windows, leading to the error.
Now that we understand the possible causes, let’s explore the solutions to fix the “Automatic Startup Repair couldn’t repair your PC” error.
Solution 1: Restart Your Computer
One of the simplest troubleshooting methods is to restart your computer. This can often resolve temporary issues or glitches that prevent your PC from starting up properly. If the error persists after restarting, move on to the next solution.
Solution 2: Boot in Safe Mode
Booting your computer in Safe Mode is another effective troubleshooting method. This allows your computer to start with a minimal set of drivers and services, helping you isolate and resolve issues that may be causing the error. Here’s how to boot in Safe Mode:
- Restart your computer.
- As the computer starts up, press the F8 key repeatedly until the Advanced Boot Options menu appears.
- Use the arrow keys to select “Safe Mode” and press Enter.
- Once in Safe Mode, you can troubleshoot further using the following solutions.
Solution 3: Disable Early Launch Anti-Malware Protection
Early Launch Anti-Malware Protection (ELAM) is designed to start antivirus and security software before any other third-party driver on a Windows device, providing an extra layer of security. However, in some cases, ELAM can interfere with the startup process and prevent the Automatic Startup Repair tool from running correctly. Disabling ELAM may help resolve the error. Here’s how:
- Reboot your computer and hold the F11 or F8 key on your keyboard while the boot screen is visible to enter the Windows Recovery Environment (WinRE). Note that some devices may require a different key or key combination.
- If you can’t access WinRE using the keyboard shortcut, turn your computer on and off until it automatically starts in the repair environment. On average, three restarts should load the environment.
- In WinRE, navigate to Troubleshoot > Advanced options > Startup Settings.
- Press the number associated with the “Disable early launch anti-malware protection” setting (usually 8).
- Your system will restart, and you can check if the error is resolved.
Solution 4: Disable Automatic Restart After Failure
When the Automatic Startup Repair tool fails to repair your PC, it may automatically restart, making it difficult to diagnose the issue. Disabling automatic restart can help you identify the error message and take appropriate steps to resolve the problem. Here’s how:
- Enter the Windows Recovery Environment (WinRE) following the steps mentioned earlier.
- Navigate to Troubleshoot > Advanced options > Startup Settings.
- Press the number associated with the “Disable automatic restart after failure” setting (usually 9).
By disabling automatic restart, you’ll be able to see the error message and troubleshoot accordingly.
Solution 5: Use the “fixboot” and “chkdsk” Commands
The “fixboot” and “chkdsk” commands can help repair disk errors and correct any corrupted sectors or files on your computer. Here’s how to use these commands:
- Enter the Windows Recovery Environment (WinRE) using the steps mentioned earlier.
- Navigate to Troubleshoot > Command Prompt.
- When the Command Prompt window appears, enter the following command:
bootrec.exe /rebuildbcd - Press Enter and follow the on-screen instructions to rebuild the Boot Configuration Data (BCD).
- Next, enter the command:
bootrec.exe /fixmbr - Press Enter to fix the Master Boot Record (MBR).
- Finally, enter the command:
bootrec.exe /fixboot - Press Enter to fix the boot sector of your hard drive.
After running these commands, check if the error is resolved and your PC starts up normally.
Solution 6: Run the System File Checker (SFC Scan)
Running the System File Checker (SFC) scan can help identify and repair corrupted system files that may be causing the error. Here’s how to run an SFC scan:
- Enter the Windows Recovery Environment (WinRE) using the steps mentioned earlier.
- Navigate to Troubleshoot > Command Prompt.
- In the Command Prompt window, type the following command and press Enter:
sfc /scannow - Wait for the scan to complete. This may take some time.
- If any corrupted files are found, the SFC scan will attempt to repair them automatically.
Once the scan is complete, restart your computer and check if the error is resolved.
Solution 7: Run the DISM Tool
The Deployment Imaging and Servicing Management (DISM) tool can help repair the system image and resolve issues that may be causing the error. Here’s how to run the DISM tool:
- Enter the Windows Recovery Environment (WinRE) using the steps mentioned earlier.
- Navigate to Troubleshoot > Command Prompt.
- In the Command Prompt window, enter the following command and press Enter:
DISM /Online /Cleanup-Image /RestoreHealth - Wait for the tool to scan your system and repair any issues it finds. This process may take some time, so be patient.
- Once the DISM tool has completed its task, restart your computer and check if the error is resolved.
Solution 8: Repair the Boot Configuration Data (BCD)
Repairing the Boot Configuration Data (BCD) can help fix issues with the boot process and resolve the error. Here’s how to repair the BCD:
- Enter the Windows Recovery Environment (WinRE) using the steps mentioned earlier.
- Navigate to Troubleshoot > Command Prompt.
- In the Command Prompt window, enter the following command and press Enter:
bootrec /rebuildbcd - Follow the on-screen instructions to scan for Windows installations and add them to the BCD.
- Once the repair process is complete, restart your computer and check if the error is resolved.
Solution 9: Restore the Windows Registry
Restoring the Windows Registry from the RegBack directory can help fix registry-related issues that may be causing the error. Here’s how to restore the registry:
- Enter the Windows Recovery Environment (WinRE) using the steps mentioned earlier.
- Navigate to Troubleshoot > Command Prompt.
- In the Command Prompt window, enter the following command and press Enter:
copy c:\windows\system32\config\RegBack\* c:\windows\system32\config - When prompted to overwrite files, type “All” and press Enter.
- Restart your computer and check if the error is resolved.
Solution 10: Reset Windows
If none of the above solutions work, you may need to reset Windows to its default settings. This option will remove any installed apps and settings but keep your personal files intact. Here’s how to reset Windows:
- Enter the Windows Recovery Environment (WinRE) using the steps mentioned earlier.
- Navigate to Troubleshoot > Reset this PC.
- Follow the on-screen instructions to reset Windows. Choose the option that allows you to keep your personal files.
Note: Before resetting Windows, make sure to back up any important files to an external storage device.
Conclusion
Dealing with the “Automatic Startup Repair couldn’t repair your PC” error can be frustrating, but with the solutions provided in this guide, you should be able to resolve the issue and get your computer back up and running smoothly. Remember to try each solution sequentially and restart your computer after implementing each fix. If the error persists, it may be wise to consult a professional or contact Microsoft support for further assistance. Stay tech-savvy and keep exploring the wonders of your Windows PC!
PC.
Experiencing difficulties with your Device, check out our “How To” page on how to resolve some of these issues.